
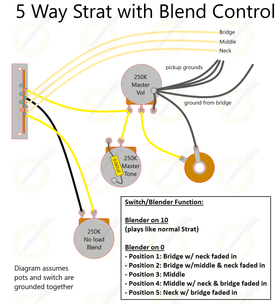
In this guide we will take you through the process of wiring your Strat® with the popular blend control mod. This circuit gives us the classic 5 Strat positions we are all familiar with but the blend control allows us to "blend" in the neck pickup so we can have:
- neck & bridge together
- all three pickups together
Essentially, this is a 7 way Strat mod.
The beauty of this circuit is that it uses a master volume, master tone for all positions and a blend control where the magic happens.
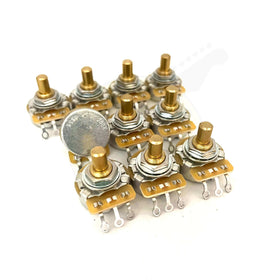
The blend control itself is a specialist potentiometer - you will need a no load/blender pot. You can either purchase a blender pot or, if you want to save money, you can easily make one yourself using our guide on how to convert a standard potentiometer into a no load potentiometer.

Wiring this setup correctly will give you the controls outlined below:
Switch and blender function:
Blend control on 10
- (Plays like a normal Strat)
Blend control on 0
- Position 1: Bridge with neck faded in
- Position 2: Bridge and middle, neck faded in
- Position 3: Middle
- Position 4: Middle and and neck, bridge faded in
- Position 5: Neck with bridge faded in
Components required:
- 2 x 250k SSS Premium® CTS pots
- 1 x 250k no load (or SSS Premium® blender pot)
- 1 x CRL 5 way switch
- 1 x 0.047uF capacitor (or capacitor of choice, this is the value we are using)
- Switchcraft® 1/4'' jack socket
- Gavitt® cloth wire (approx 3ft in total)
- 3.2mm heat shrink tubing
- Wiring diagram
All of these components are available individually from our electronics section or available in the form of a dedicated wiring kit.
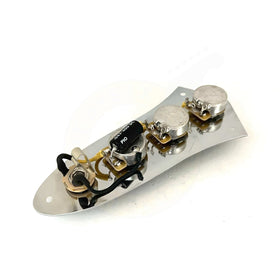
Step One
Assemble your potentiometers and switch into your pickguard as per the below photo. It is advantageous to the master tone control (middle pot) facing the volume control to make it easier for a jumper connection we'll be making later. However, you can have it facing the other way if you prefer.

Step Two
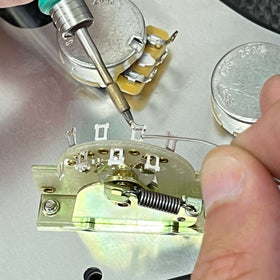
Next, ground the lug on the volume pot - this makes the potentiometer function as a volume control. Fill the eyelet with solder, then bend it back onto the pot casing. Hold your soldering iron behind it as per the below photo.

The heat from the iron will re-flow the solder and create a bridge between the lug and the pot casing, thereby grounding it.

Step Three
We need to ground the three pots together. Using either the cloth wire provided, or tinned copper, run a wire connecting the three pots - either solder on the top or the side of the pot casing just like the below examples.
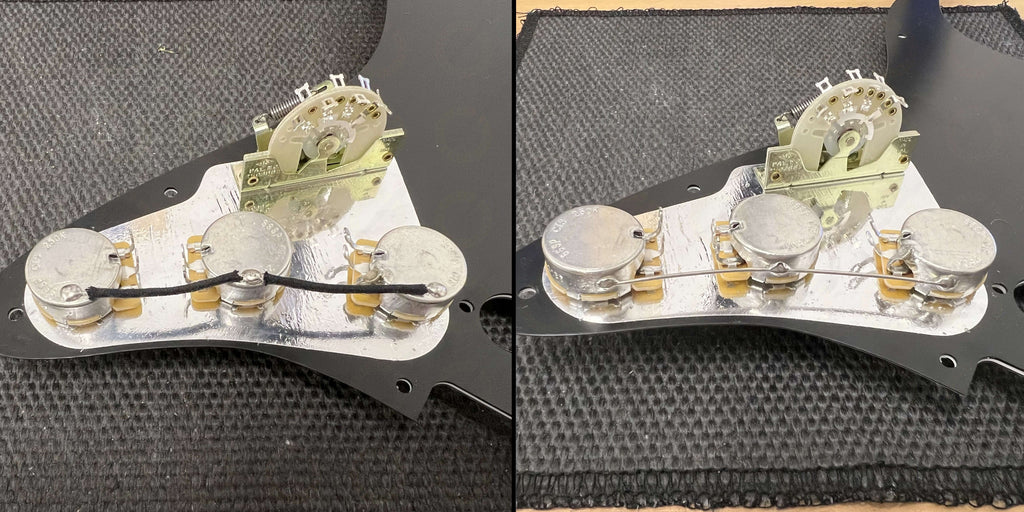
Alternatively, for a neater and cleaner job you can skip this bit if you are using a Strat grounding plate - we stock two versions - a "control area only" plate and a full pickguard sized plate. The problem with relying only on the foil that comes as standard on pickguards is that it is very thin and very delicate. The teeth of the lock washers alone are enough to cut through it very easily. You can never over-ground a passive guitar.

Step Four - Capacitor
Connect the capacitor to lug 3 of the master tone control, This is the lug nearet the switch in our photo. Solder the other end of the capacitor to ground on the top or side of the pot casing.

Step Five
Connect the switch output (common lug) to the volume input lug - whilst here, we can connect the volume control to our tone control. From the same volume input lug, solder a jumper wire across to the output (middle lug) of the tone control.

NB - we are using a snipped off capacitor lead for this jumper wire. As the distance between the tone control and volume control is so short, there is no risk at all of having this unshielded wire acting as an antennae for feedback or interference. If on the other hand you have your tone control facing the other way, then using an alternative is advised.

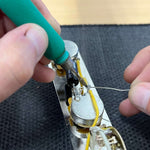
Step Six - Wiring the Blend Control
Wiring the blend control is nice and easy. As you can see in our photos below, we snip of the first (input) lug of the blend pot as it is not being used. We also use 2 different colours, black and yellow, simply to make it easier to follow.
Solder one wire, either colour, but we are using black here, to the third lug of the blend pot. It is 100% optional to cover this connection with heat shrink we simply do it out of habit - no other reason. Connect the other end to the switch - the lug directly next to the common lug we soldered earlier.

Next, repeat this process on the remaining lug on the blend pot - using the yellow wire, connect this to the lug on the switch nearest to you.

Step Seven - Pickups
With the main controls complete, next we move onto the pickups. Nice and simple! One good tip with single coil pickups is to tightly twist the ground and signal wires together - this is entirely optional - but cloth wire is superb in it's own right at noise reduction when the ground is wrapped around the signal wire. Of course, if you like a little bit of natural feedback then best not to bother.

Either way, funnel the wires neatly in a downward direction as per the photo, whether you twist them or not.
Our pickups will be grounded onto the pot casing. To do this, twist the ends of the three ground wires together, tin them together and then solder them together onto the pot casing. If you find it easier to ground them each individually, then that works fine too.
Connect the three signal wires to the switch accordingly as per the below photo.
You can also refer to the wiring diagram at the end of the article for further clarification.

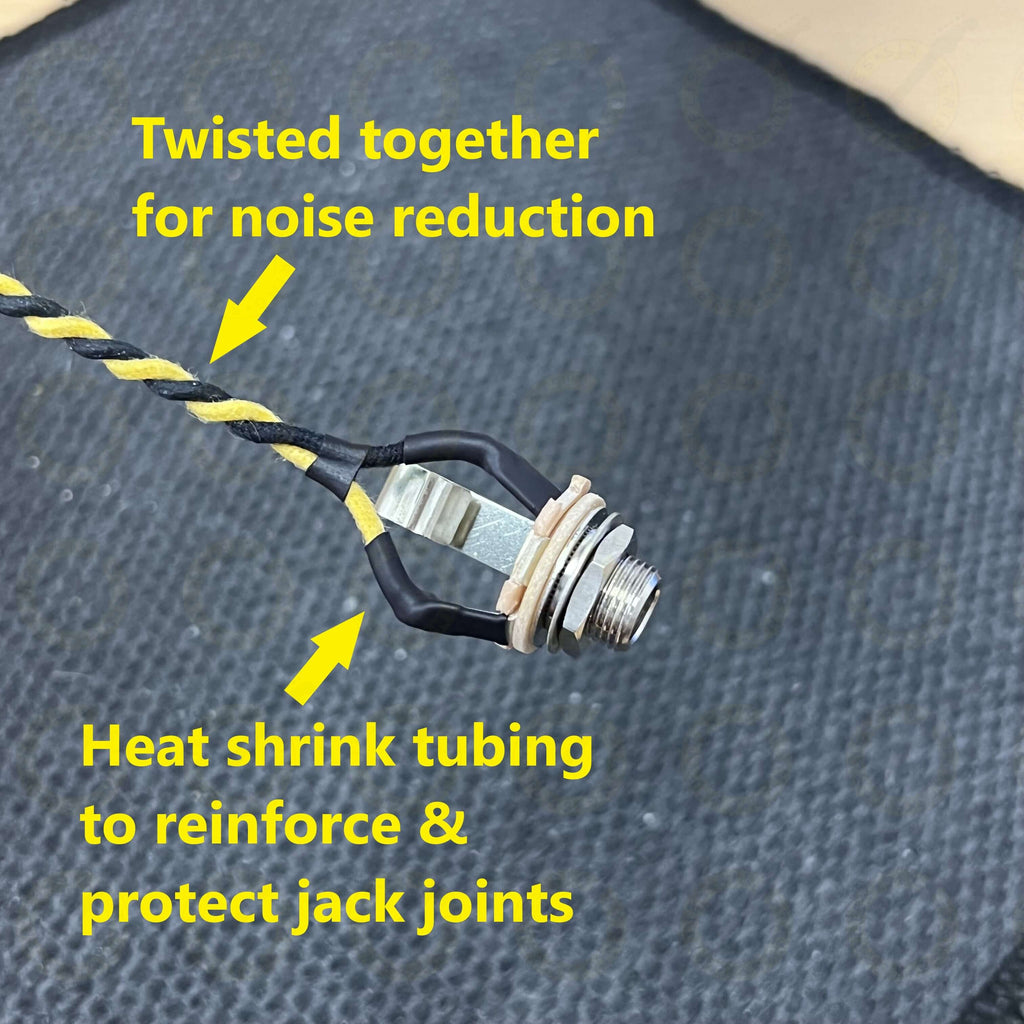
Step Eight - Jack Socket
We have covered jack socket wiring in our Strat wiring guide but to recap.
- Know what lug is what
- Optional to cover joints in heat shrink
- Twist ground and signal wires together.
- Signal wire gets soldered to volume control output (middle lug)
- Ground wire to pot casing (ground)
Ground lug is always on the inner ring. With Switchcraft jacks, this is where you will find the brand stamping. The ground lug is known as the sleeve.
The other lug is our positive or signal lug. This is known as the tip.


We have always covered the joints in heat shrink and twisted the two wires tightly together. The heat shrink for a more durable jack and longer lasting jack socket (it also stops the signal lug shorting on any shielding material for example) and twisted wires to help reduce EMI (electro-magnetic interference)
Step Nine
We're nearly good to go - the final step is connecting the main ground from the bridge/tremolo to our circuit.
Your Strat should have a little peep hole running from the main cavity through to the tremolo system on the other side. If you re simply re-wiring your guitar, this wire will already be there. However if you are building from scratch or doing a partscaster kit, you will need to do this.
Simply solder one end of the ground wire to the top of one of the pot casings (volume is nearest) and feed this through to the tremolo claw. On the claw there is a latch. Solder the end to this latch as per the below photo.

There we have it! How to do the blend wiring mod in your Stratocaster. Use the video at the top of the page, this guide and the diagram below to take you through the process.

More Strat Wiring Diagrams:
Gilmour 7 Way Wiring (mini toggle)
5 way (neck + bridge) Superswitch
More Wiring Tutorials: