

We like to think of the output jack socket as being the guitar's version of a car ignition.
It is the most important component in a properly working circuit. The reason being, all grounds in our circuit terminate at the jack socket, be it potentiometer grounds, pickup grounds, capacitor grounds etc...ALL grounds end at the jack. The output jack is the only ground in a passive guitar circuit.
All guitar circuits essentially have two circuits - the signal (or hot) circuit and the ground circuit.
This is highlighted perfectly on a jack socket as each mono jack has 2 lugs, the sleeve (ground) and the tip (signal).
In this guide we will demonstrate how to wire a guitar jack socket properly and how to wire it using cloth wire and also using braided hook up wire.
All mono jack sockets are the same but we are demonstrating a Switchcraft® jack in this guide.
It is important to identify which lug is the ground and which lug is the tip.

The ground lug is always the one that is connected to the inner ring and the sleeve (hence the name). On Switchcraft® jacks it is easily identifiable as this is where the company branding is stamped.
As mentioned earlier, this is the most important connection in our whole circuit.
Method One (standard single core wire)
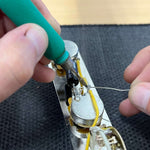
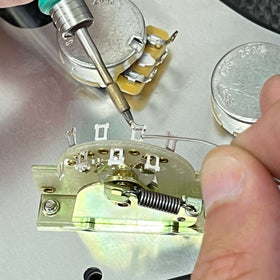
We're using cloth wire as it is nice and easy to work with. Simply push back the cloth and thread the wire through the ground lug of the jack. Bend it round so the wire makes contact with both sides of the lug. It is important that our jack socket has a strong and reliable mechanical connection.
Solder into place and repeat this process for the tip (signal lug). Typically you will use 2 different colours of wire so you can easily distinguish between the two.

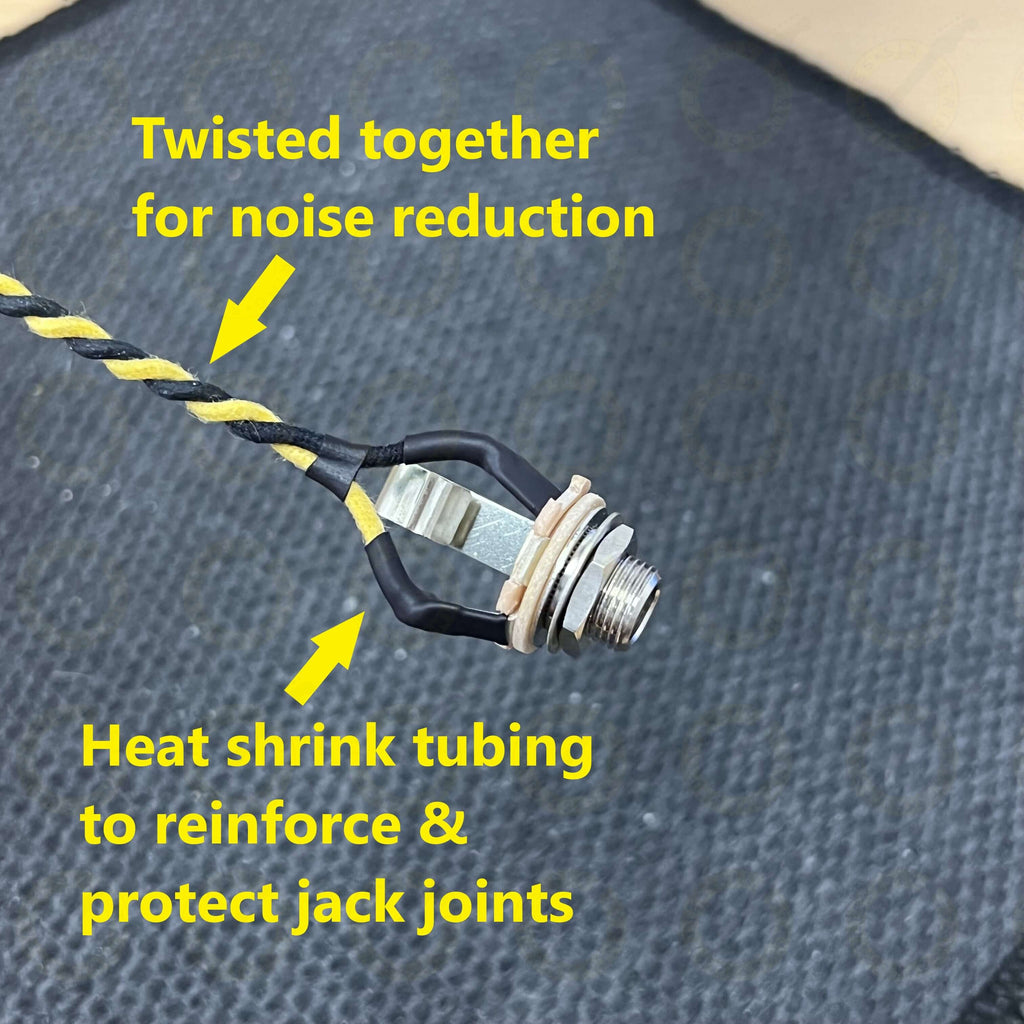
Now this next bit is completely optional - we like to cover the completed joints with 1/2'' or so of heat shrink tubing. This simply protects the joint and creates a more durable jack socket. It also stops the cloth fraying over time or the signal joint from coming into contact with something it shouldn't (copper shielding for example) or another ground connection which would result in a short circuit).
Finally, again, this is optional but definitely recommended. Tightly twisting the two wires together (essentially wrapping the ground wire around the signal wire) helps reduce feedback and unwanted EMI.
The above example is for single core wire and typically what we would use in most situations when wiring guitars.
To finish the job - the ground wire (black in our example) needs to be soldered to ground, normally this is easiest by soldering to the top of the potentiometer casing.
The signal wire (yellow) gets soldered to the output of the volume control - this is the middle lug of the volume potentiometer.
Method Two (Gibson style Braid)
The other method involves using vintage style braided hook up wire commonly used in Gibson models. It is usually found coming from the toggle switch and you are required to connect this wire to the jack.
Braided wire is feared by many hobbyists and DIY modders as it is seen as being harder to work with - but the below tips should give you an easier method to working with it.
Braided hook up wire is two wires in one - the outer braid is the ground whist the inner cloth wire is the signal.

Same principle applies - we are soldering the outer braid to the ground lug (sleeve) and the inner cloth wire to the tip of the jack socket.
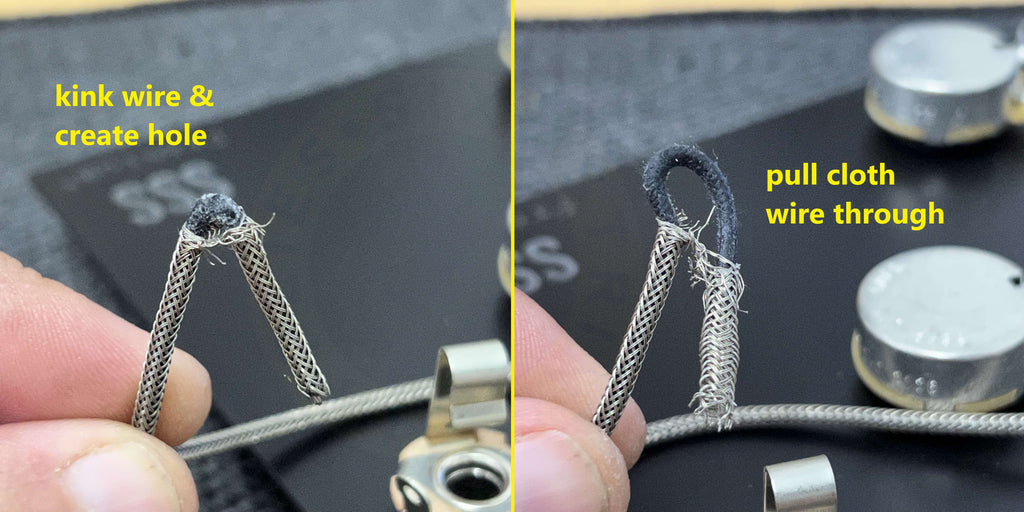
First, we need to seperate the braid from the inner cloth wire - there are two ways to do this:
- Either kink the wire, create a little hole and pull the inner cloth wire through the gap.
- Or using a pair of fine nose pliers, cut up the braid and seperate it that way (a graphic image but try to imagine a surgeon cutting the pants/trousers away from a patients leg on the operating table).

Whichever method you choose, leave a little "ledge" or "pigtail" of the braid.
Now this next bit is optional, but before we solder the wire to the jack socket, you can feed some heat shrink tubing up the the length of the wire and out of the way for now (do not shrink it yet)

Now it is time for some soldering! Start with the inner cloth/signal wire first. Push the cloth back and feed it through the lug - again, feed it through and back on itself so the wire is in solid contact with both sides of the solder lug and solder it into place.
When it has cooled, you can push the *optional* length of heat shrink tubing back down and over the joint.
To connect the braid, again, we need to aim for a good mechanical connection - and this is where our cheeky little pig tail comes into play. Feed this through and bend it back round on itself so it acts like a hook. Then solder this into place.

There you have it - that covers the two most typical options of wiring a guitar jack. Remember, this only covers a standard mono jack socket, not stereo.
More Guides
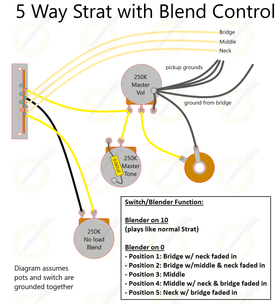
How To Wire a Strat With Blend Control