
The popular 4 way Telecaster wiring mod goes one better than the classic 3 way Tele wiring. With standard Telecaster wiring, the switch gives you the options of playing the neck pickup, the bridge pickup and playing both in parallel. By changing it to a 4 way switch, this mod allows you to play both pickups in series, offering a fuller, fatter tone. The best thing about this mod is that you actually keep the classic 3 way options still available to you.
We recommend reading this article and studying the wiring diagram before attempting the mod yourself. You always have the video for reference as well. The components used are from our 4 way Telecaster wiring kit.

Switch Position Controls:
- 4) Neck and bridge in series together
- 3) Neck pickup (standard Telecaster)
- 2) Neck and bridge in parallel (standard Telecaster wiring)
- 1) Bridge pickup (standard Telecaster wiring)
There is a little modification required to your neck pickup that we will outline in this guide which requires you to un-ground the metal cover from the pickup and then add a third wire (a new ground wire) from the casing to the back of the volume pot. We'll deal with that later...
For the 4 way Tele mod you will need:
- 1 x OAK Grigsby USA 4-way switch
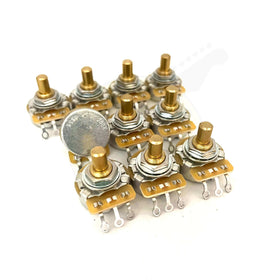
- 2 x 250k solid shaft audio pots (CTS)
- 1 x Switchcraft 1/4'' jack socket
- 1 x 0.047uF capacitor
- Push back cloth guitar wire
- Heat shrink tubing (optional)
- 25w-70w soldering iron (preferably temperature adjustable)
- Lead free silver solder (or 60/40 tin/lead)
- Wiring diagram

Preparation
- Practice makes perfect - it is best to practice on low quality/spare parts to get a feel for your soldering equipment. Its not the end of the world if you burn out a pot or make a complete hash of things but it saves you having to buy the components again.
- Soldering iron - Keep your soldering iron clean and tinned throughout the process. The key to a good solder connection is heat transfer and this is only possible with a clean tip. Brass shavings/wool works well.
- Tinning - As well as your soldering iron tip, take the time to tin the lugs of pots and switches, the back/side of the pots and the ends of the wire you will be using. Tinning the components makes for a better and more solid electrical and mechanical connection.
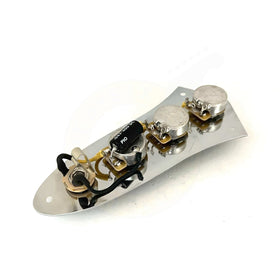
Part One - Wiring the Harness (controls and switch)
Assemble the CTS pots and OAK 4 way switch in the control plate as you would with a normal Telecaster - ie. tone and volume controls facing each other. In regards to the switch, it doesn't matter which way round it sits in the control plate - it will work the same either way.

Capacitor
By starting with our capacitor, we also take care of grounding the lug on the volume pot at the same time. Winning! Solder the capacitor from the output (middle lug) of the tone control and the other end of it through the third lug on the volume pot - running it through to the top of the pot casing where we ground it. As we are running it through the volume lug, we ground this at the same time. Refer to the below photo.

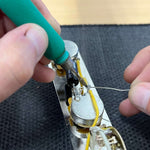
Tele 4 Way Switch Wiring
Moving onto the 4 way switch, familiarise yourself with the below diagram - it differs somewhat from a standard 3 way switch. There are five lugs on each side as opposed the four. To make it easier to understand, we have labelled the lugs 1-10 and will refer to them in this way from now on with the relevant lug being highlighted on the photos.

Start off by connecting lugs 4 and 10 together. You can either use cloth wire and bend it down, round and back up, or use a staple shaped jumper wire as we have in the below photos. The distance is minimal so there is no danger in using a bare wire in this way for this.

Next, connect lugs 7 and 8 together - using the yellow cloth wire provided in the wiring kit, pull the cloth back and solder the end of the wire to lug 7 and then solder directly to the lug next to it (lug 8).

The other end of the yellow wires needs to get connected to the volume input lug. The aim is have one continuous wire from lug 7, to lug 8, to the volume control. Whilst we are here, we also need to solder a wire from the volume input lug to the lug directly opposite on the tone control.

Moving onto the other side of the switch - repeat the process using the black wire provided, connect lugs 2 and 3 together as per the below photos.

Once completed, we need to ground the end of this wire. Solder it to the pot casing - either the top or the side of the pot casing as we have done below. You might find it easier to solder onto the top - but putting it on the side leaves more room for the multiple grounds we need to solder later on.

Wiring the jack socket
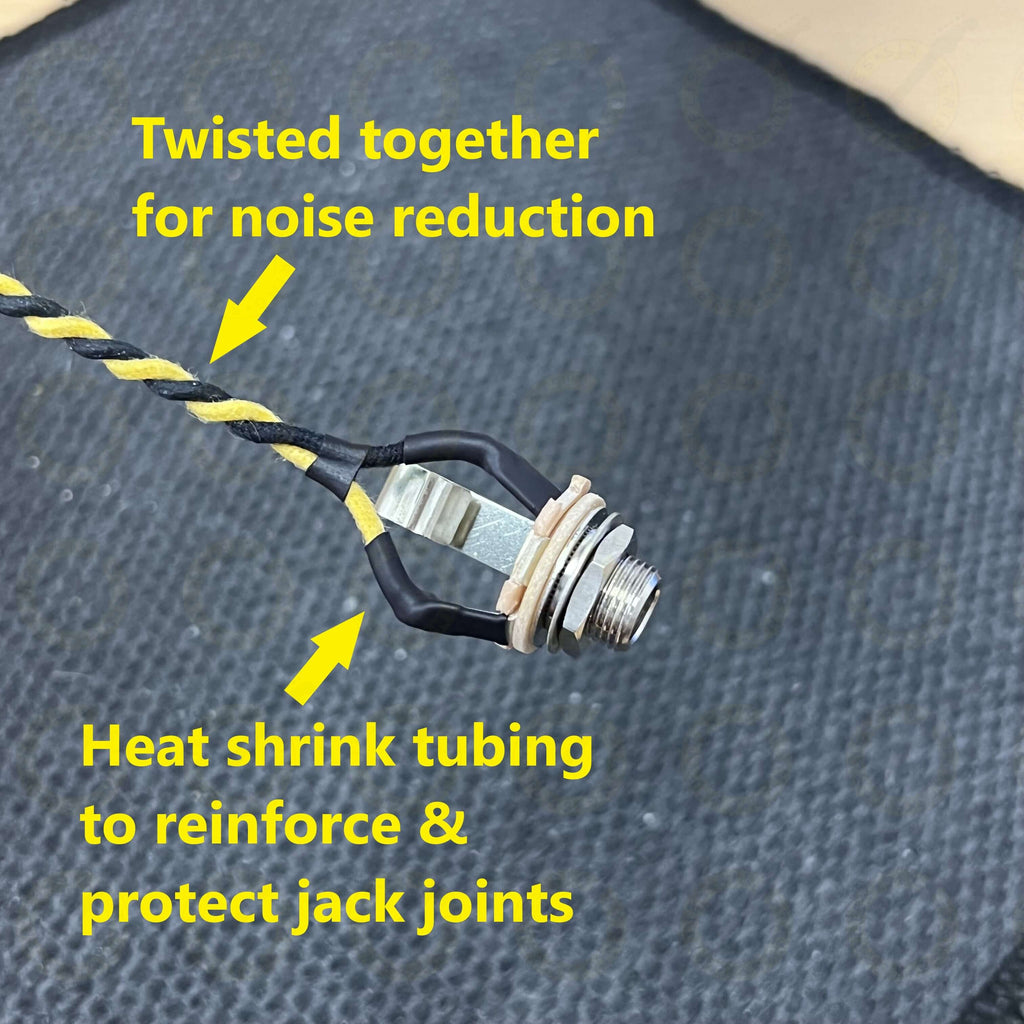
Nearly there! Time for the jack socket. Switchcraft jack sockets (all mono jack sockets actually) have 2 lugs - one being the sleeve, or ground, the other being the tip. The sleeve or ground lug is always on the inner ring - on a Switchcraft jack socket, this is where the brand stamp is.

Solder the black wire to the ground lug and the yellow wire to the tip. Be sure to bend the wire through and round the lug so the wire comes into contact with both sides of the solder lug. It is imperative to have a mechanical connection here. With our wiring kits, we provide a length of heat shrink tubing and the below photo is what we recommend it is used for. Cover the jack socket joints with the 3.2mm diameter tubing and shrink it down.

This is 100% optional of course - but does provide a more durable and longer lasting jack socket. Again, whilst optional, it is recommended to twist the two wires together. Cloth wire is superb at shielding against unwanted feedback if the ground wire is tightly wrapped around the signal wire. It is good practice to do the same with single coil pickups too.
Connect the jack's live wire to the middle lug of the volume control and ground it to the back of either pot casing. Traditionalists will say this should be the volume pot - but ground is ground - so we will put it on the back of the tone control.

Modifying the Neck Pickup
As mentioned at the top of the page, you need to add a second ground wire to the neck pickup and run this ground to the back of the volume pot. Modifying is a strong word in this case as you are not actually touching the internal wiring at all. Follow the two below photos.
First, you need to un-ground the metal pickup casing. It is grounded to the pickup normally by a small thin wire on the underside, from the pickup coil start (ground) to the metal tab on the underside of the pickup cover - you need to break this connection. Depending on the pickup manufacturer, this is often the actual lead wire that is bent round - in which case, you will need to cut it rather than de-soldering it.

Then solder a new wire to the cover tab. Ideally, use a different colour so you know which wire is which - or put some tape around it so it is easily identifiable. This is the cover ground - in our setup, the pickup ground itself goes to the switch - we need to ground the cover separately otherwise it will act as antennae for noise and feedback.
NB if your pickup does not have a cover (and only consists of a signal and ground wire) then you do not need to do this step.
Installation
With the control plate in the control cavity - time to connect our pickups and bridge ground to the circuit. It is essential that you get the grounding right with the 4 way series mod, because our neck pickup does not get grounded in the normal way, making it more vulnerable to feedback.
Bridge Ground
Most Telecaster models will have a ground wire that gets trapped under the bridge when it is screwed down flat onto the guitar body - ensure your Telecaster has a solid ground connection to the bridge.

First off - the main ground wire coming from the bridge needs to be soldered to the top of the volume pot casing. Then, the bridge pickup ground wire also gets grounded.
Thirdly, the neck pickup cover wire (the yellow one we just added on the neck metal cover) gets grounded too.
NB - you can twist all of these three grounds together and solder them together onto the pot casing, or you can solder them separately as we have done in the below photos.

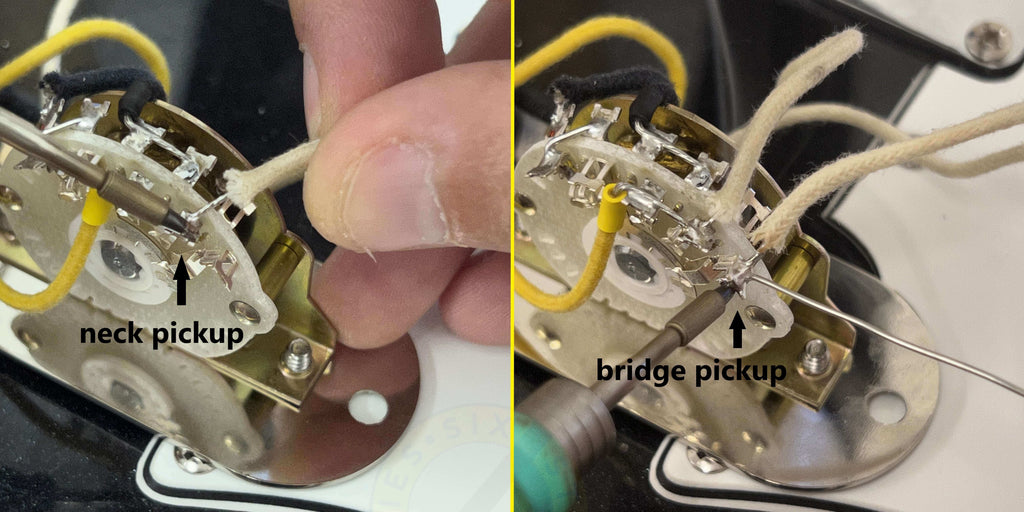
The neck pickup ground wire (the coil start wire) gets soldered to the switch. Solder this to lug 5.

For the pickup signal/hot wires themselves, they go to the other side of the switch, to lugs 6 and 7.
Solder the bridge pickup to lug 6 and the neck pickup to lug 7.
That's pretty much it - ensure you have everything well grounded and refer to the diagram for reference to check you have not missed anything.
Optional...Add a Treble Bleed
One downside to the classic Telecaster wiring is the loss of high end clarity as the volume is decreased, which can result in a muddy tone. To overcome this you can add a treble bleed/treble pass capacitor over the input and output lugs of the volume control. This helps to maintain the high end frequencies as you lower the volume, resulting in a clearer and more rounded volume sweep.

The 4 way Telecaster mod adds an extra dimension to a cult classic without losing the tonal variety of the 3 way that has become one of the world's most loved guitars.
Wiring Guides
How to Wire a Les Paul (50s style)
Wiring a Guitar Jack with Braided Wire
More Telecaster Wiring Diagrams
3-Way Telecaster (read our guide to Telecaster wiring)